How to
How to Cancel Subscriptions on iPhone
In an era where digital services have become intertwined with our daily lives, managing subscriptions has become a crucial aspect of digital literacy. From streaming platforms to fitness apps, the convenience of auto-renewing services often comes with the challenge of keeping track of what we’re subscribed to and, more importantly, how to opt out when the time comes. For iPhone users, Apple has streamlined this process through the Settings app, ensuring that managing your subscriptions is as intuitive as using the device itself. This guide will walk you through the steps to cancel subscriptions on an iPhone, ensuring you have control over your digital commitments.
Understanding Subscriptions on iOS
Before diving into the cancellation process, it’s essential to understand how subscriptions work on the iOS ecosystem. When you subscribe to a service through an iPhone app, the subscription is tied to your Apple ID, making it accessible across all your devices. This centralized approach simplifies subscription management but also highlights the importance of regularly reviewing your commitments to avoid unwanted charges.
Step-by-Step Guide to Canceling Subscriptions
Accessing Your Apple ID Account Settings
The journey to canceling a subscription begins with your Apple ID account settings, the hub for managing your digital relationship with Apple. To access it, open the Settings app and tap on your name at the top. This area not only houses your personal information but also links to various aspects of your digital presence, including subscriptions.
Navigating to Subscriptions
Within the Apple ID account settings, you’ll find the “Subscriptions” option. Tapping on this will reveal a list of all the active and expired subscriptions associated with your Apple ID. This comprehensive view allows you to assess your current subscriptions, reminding you of ongoing commitments and perhaps even uncovering forgotten ones.
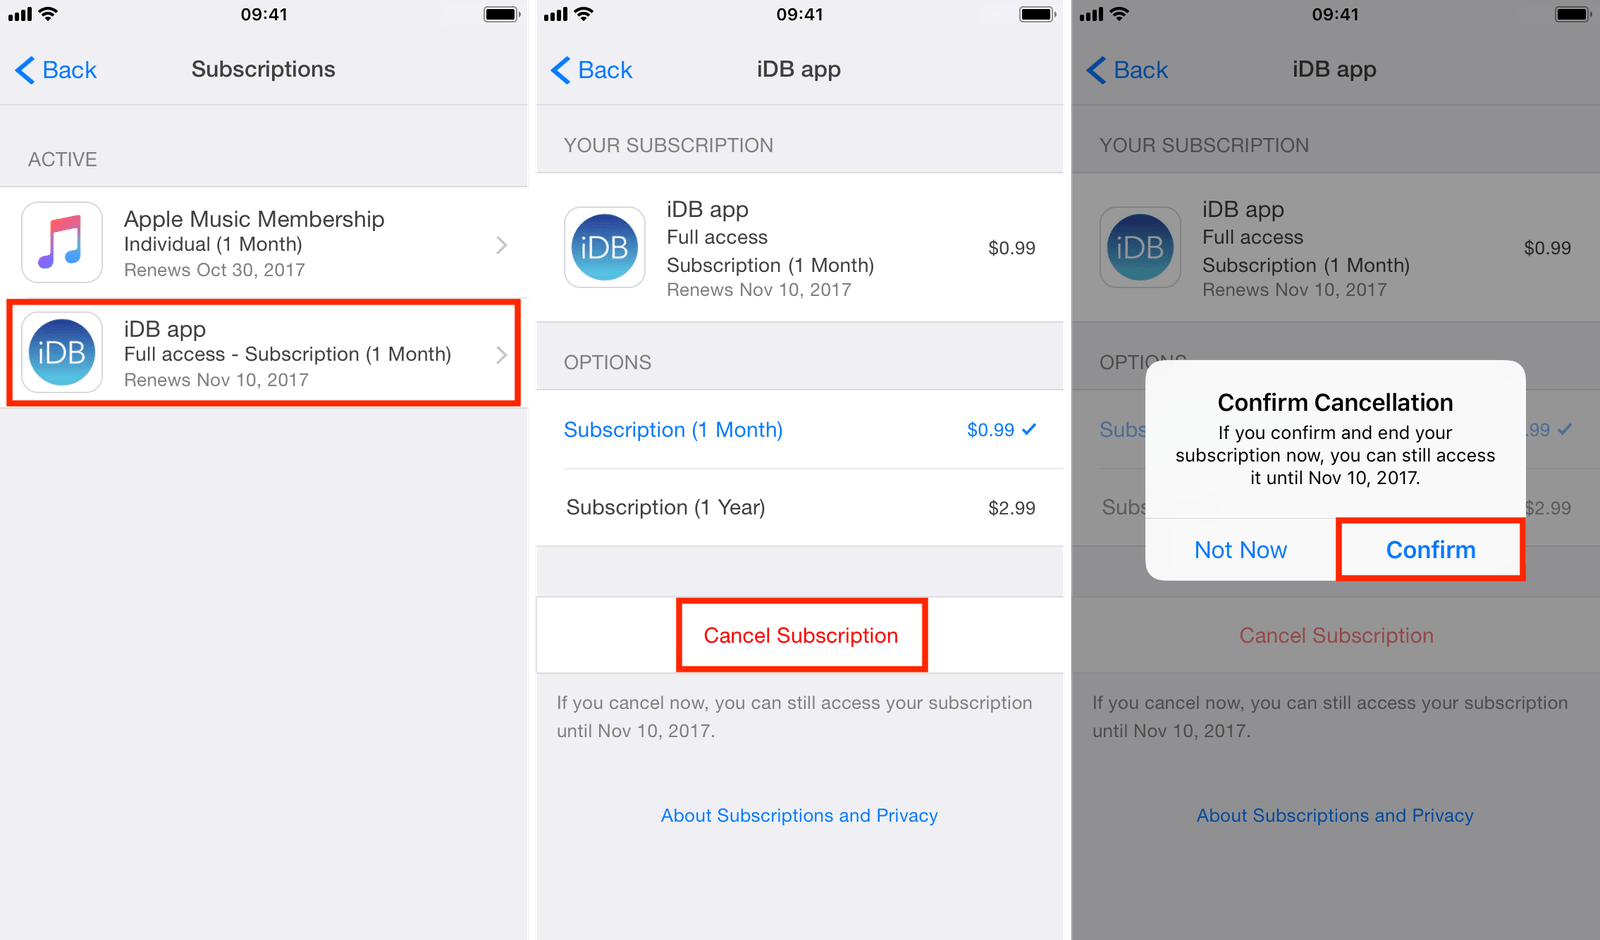
Cancelling a Subscription
After identifying the subscription you wish to cancel, the process is straightforward. Select the subscription from the list, and you’ll be presented with its details, including the renewal date and pricing. Here, you’ll find the “Cancel Subscription” option. Tapping this will prompt a confirmation, ensuring you’re making an informed decision. Once confirmed, the subscription will not renew after the current billing period ends.
Understanding the Implications of Cancellation
It’s important to note that cancelling a subscription doesn’t immediately end your access to the service. Instead, you’ll continue to have access until the end of the current billing cycle. This policy allows you to make the most out of the service you’ve paid for, without the worry of immediate cutoff.
Troubleshooting Common Issues
Subscription Not Appearing
Occasionally, you might find that a subscription you’re looking to cancel doesn’t appear in your list. This discrepancy can occur for several reasons. If the subscription was set up directly through a service provider and not through the App Store, it won’t appear in your Apple ID subscriptions. In this case, you’ll need to contact the service provider directly to cancel.
Family Sharing Considerations
For those using Family Sharing, it’s worth noting that only the family organizer can manage subscriptions purchased by family members. This centralized control ensures that subscriptions are managed efficiently within the family group, but it also means that individual members cannot cancel subscriptions on their own.
Preventing Unwanted Subscriptions
Prevention is always better than cure. To avoid the hassle of cancelling subscriptions, consider taking a proactive approach to subscription management. Regularly reviewing your subscriptions can help identify and prevent unwanted renewals. Additionally, taking advantage of free trials without the risk of forgetting to cancel can be achieved by setting reminders to review the subscription before the trial period ends.
Conclusion
Managing digital subscriptions is a necessary skill in today’s connected world, and for iPhone users, Apple has made this process as seamless as possible. By following the steps outlined above, you can take control of your digital subscriptions, ensuring that you’re only committed to the services you truly value. Remember, regular reviews of your subscriptions can save you from unwanted charges and help maintain a healthy digital lifestyle. Whether it’s a fitness app you no longer use or a streaming service you’ve replaced, knowing how to cancel subscriptions on your iPhone empowers you to make informed decisions about your digital consumption.
FAQs on How to Cancel Subscriptions on iPhone
1. Can I cancel a subscription through the iPhone app itself?
In most cases, subscriptions initiated through an iPhone app need to be canceled via the Apple ID settings, not directly within the app. Some apps may provide a link or instructions to direct you to the subscription settings, but the actual cancellation process occurs through your Apple account settings.
2. What happens if I accidentally cancel a subscription?
If you cancel a subscription by mistake, you can usually resubscribe immediately. However, the terms, including any special pricing or trial periods, might differ from your original subscription. It’s best to check the details upon resubscribing to understand the new terms.
3. Will I get a refund after canceling a subscription?
Apple’s policy generally does not offer refunds for subscription cancellations. When you cancel a subscription, you’ll typically retain access to the service until the end of the current billing cycle. However, you can contact Apple Support to discuss any exceptional circumstances.

Secure Your Home and Vehicle with Professional Glass Services

Michael Clements: Steering Windward Toward Innovation and Sustainability

The Ultimate Guide to Hibbett Sports: Your Go-To for Athletic Gear

Navigating UF Canvas: A Comprehensive Guide

Navigating Mr. Cooper Login: A Comprehensive Guide

A Deep Dive into the World of the Purple Mattress

The Emotional Depths of “La Curiosidad” Lyrics by Ivan Cornejo

Understanding Pi123: Unraveling the Mysteries of a Unique Mathematical Concept

Brightspace Oswego: A Comprehensive Guide to Navigating the Future of Education

Discovering Saro Gullo: A Hidden Gem

A Tale of Potential Unfulfilled: The Life and Death of Notti Osama

Find USPS Locations Near Me: Convenient Postal Services at Your Fingertips

The Untold Side: How Doxycycline Ruined My Life

Snow White 2024: A Timeless Tale Reimagined

The Pillars Behind The Success: Exploring Storm Reid Parents
Discovering Saro Gullo: A Hidden Gem

The Transformation Journey of Nikocado Avocado Weight Loss

The Comprehensive Guide to SSSTwitter: Revolutionizing How We Download Twitter Videos

Unblocked 911: Navigating the World of Free Online Gaming

Abigail Hawk: Unveiling the Talent and Journey of the ‘Blue Bloods’ Star
Secure Your Home and Vehicle with Professional Glass Services
Michael Clements: Steering Windward Toward Innovation and Sustainability
The Ultimate Guide to Hibbett Sports: Your Go-To for Athletic Gear
Navigating UF Canvas: A Comprehensive Guide
Navigating Mr. Cooper Login: A Comprehensive Guide
A Deep Dive into the World of the Purple Mattress
The Emotional Depths of “La Curiosidad” Lyrics by Ivan Cornejo
Understanding Pi123: Unraveling the Mysteries of a Unique Mathematical Concept
Brightspace Oswego: A Comprehensive Guide to Navigating the Future of Education